PyWebview 打包安卓全过程记录
PyWebview 文档中简单介绍了如何将 PyWebview 程序打包为安卓应用,但缺乏详细过程,网上相关文档也不多,因此记录一下整个打包流程,分享给有需要的人。
1. 准备 Linux 环境
跟随文档,转到 Buildozer 文档,照做就好。
官网对 Windows 系统构建安卓应用的描述为:
To use buildozer in Windows you need first to enable Windows Subsystem for Linux (WSL) and install a Linux distribution: https://docs.microsoft.com/en-us/windows/wsl/install.
These instructions were tested with WSL 1 and Ubuntu 18.04 LTS, and WSL2 with Ubuntu 20.04 and 22.04.
After installing WSL and Ubuntu on your Windows machine, open Ubuntu, run the commands listed in the previous section, and restart your WSL terminal to enable the path change.
Copy your Kivy project directory from the Windows partition to the WSL partition, and follow the Quickstart Instructions. Do not change to the project directory on the Windows partition and build there, this may give unexpected and obscure fails.
For debugging, WSL does not have direct access to USB. Copy the .apk file to the Windows partition and run ADB (Android Debug Bridge) from a Windows prompt. ADB is part of Android Studio, if you do not have this installed you can install just the platform tools which also contain ADB.
Go to https://developer.android.com/studio/releases/platform-tools and click on “Download SDK Platform-Tools for Windows”.
Unzip the downloaded file to a new folder. For example, “C:\platform-tools”.
翻译:
若要在 Windows 中使用 buildozer,首先需要启用适用于 Linux 的 Windows 子系统 (WSL) 并安装 Linux 发行版:https://docs.microsoft.com/en-us/windows/wsl/install。
这些说明在 WSL 1 和 Ubuntu 18.04 LTS 上进行了测试,并在 WSL2 上使用 Ubuntu 20.04 和 22.04 进行了测试。
在 Windows 计算机上安装 WSL 和 Ubuntu 后,打开 Ubuntu,运行上一节中列出的命令,然后重新启动 WSL 终端以启用路径更改。
将 Kivy 项目目录从 Windows 分区复制到 WSL 分区,然后按照快速入门说明进行作。不要更改到 Windows 分区上的项目目录并在那里构建,这可能会导致意外和模糊的失败。
对于调试,WSL 无法直接访问 USB。将.apk 文件复制到 Windows 分区,然后从 Windows 提示符运行 ADB(Android 调试桥)。ADB 是 Android Studio 的一部分,如果您没有安装它,您可以只安装也包含 ADB 的平台工具。
转到 https://developer.android.com/studio/releases/platform-tools 并单击“下载适用于 Windows 的 SDK 平台工具”。
将下载的文件解压缩到新文件夹中。例如,“C:\platform-tools”。
因此,我们应当先安装 wsl 版本的 Ubuntu,且只能安装 20.04 或 22.04(在 wsl2 中)。
1.1 安装 wsl Ubuntu
如果不熟悉 wsl 安装,可以参考以下简介,或另行搜索相关信息。为确保环境干净,不出现疑难杂症,建议安装一个新的 wsl 虚拟环境。
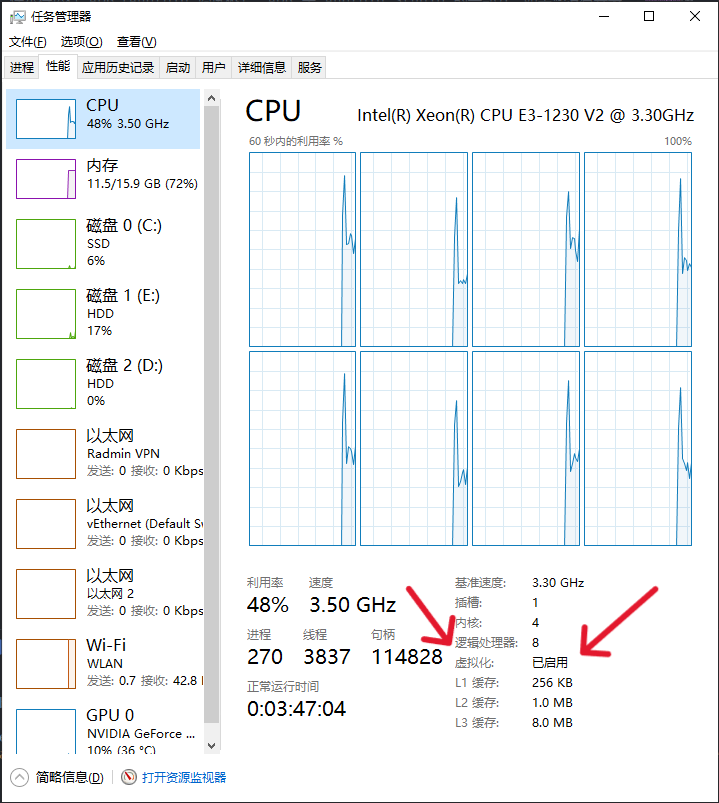
- Ctrl + Shift + Esc 打开任务管理器,点击
性能选项卡,查看 CPU 详细信息,其中有一条名为虚拟化的条目,如显示已启用,说明虚拟化已开启,可以继续安装。如果显示已禁用,则需要开启虚拟化,具体操作请自行搜索。
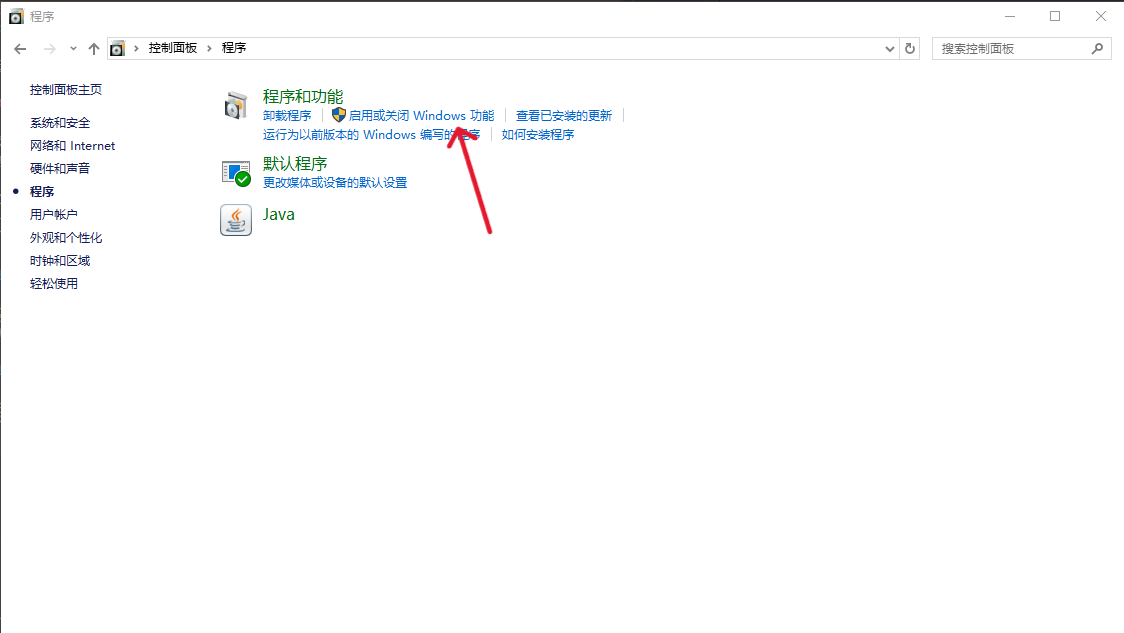
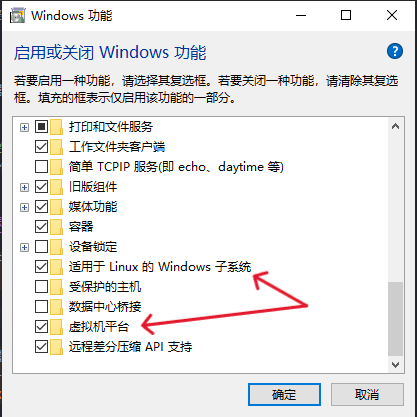
- Windows + R 打开运行,输入
control打开控制面板 -> 程序 -> 启用或关闭 Windows 功能,打开适用于 Linux 的 Windows 子系统和虚拟机平台两项功能。
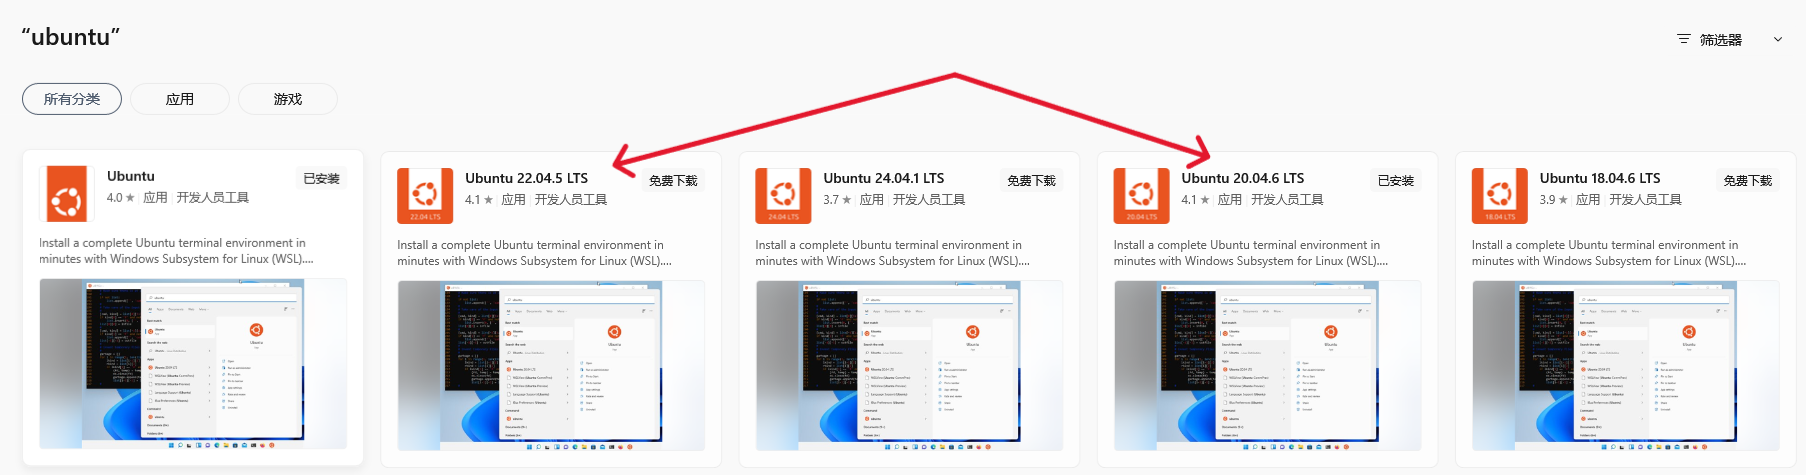
- 打开 Microsoft Store,搜索
ubuntu,安装Ubuntu 20.04.6 LTS或Ubuntu 22.04.5 LTS。等待安装完成,自动弹出一个命令行,按照提示输出初始用户名和密码(输密码时不会显示字符)。
1.2 安装依赖环境
官网原文:
(expected to work as well in later version, but only regularly tested in the latest LTS)
2
3
4
5
6
sudo apt install -y git zip unzip openjdk-17-jdk python3-pip autoconf libtool pkg-config zlib1g-dev libncurses5-dev libncursesw5-dev libtinfo5 cmake libffi-dev libssl-dev
pip3 install --user --upgrade Cython==0.29.33 virtualenv # the --user should be removed if you do this in a venv
#add the following line at the end of your ~/.bashrc file*
export PATH=$PATH:~/.local/bin/If openjdk-17 is not compatible with other installed programs, for Buildozer the minimum compatible openjdk version is 11.
翻译:
(预计在以后的版本中也能正常工作,但仅在最新的 LTS 中定期测试)
2
3
4
5
6
sudo apt install -y git zip unzip openjdk-17-jdk python3-pip autoconf libtool pkg-config zlib1g-dev libncurses5-dev libncursesw5-dev libtinfo5 cmake libffi-dev libssl-dev
pip3 install --user --upgrade Cython==0.29.33 virtualenv # the --user should be removed if you do this in a venv
# add the following line at the end of your ~/.bashrc file
export PATH=$PATH:~/.local/bin/如果 openjdk-17 与其他已安装的程序不兼容,则对于 Buildozer,最低兼容的 openjdk 版本为 11。
另外,我们还需要安装 buildozer:
1 | pip3 install --user --upgrade buildozer |
这一步很简单,只要打开刚刚安装的 Ubuntu,按照如上指示操作即可。我自己安装时没有加 pip –user 参数,也能正常用。
2. 设置打包信息
官网原文:
Buildozer will try to guess the version of your application, by searching a line like version = “1.0.3” in your main.py. Ensure you have one at the start of your application. It is not mandatory but heavily advised.
Create a buildozer.spec file, with:
Edit the buildozer.spec according to the Specifications. You should at least change the title, package.name and package.domain in the [app] section.
Start a Android/debug build with:
Now it’s time for a coffee / tea, or a dinner if you have a slow computer. The first build will be slow, as it will download the Android SDK, NDK, and others tools needed for the compilation. Don’t worry, thoses files will be saved in a global directory and will be shared across the different project you’ll manage with Buildozer.
At the end, you should have an APK or AAB file in the bin/ directory.
翻译:
Buildozer 将尝试通过搜索 像 version = “1.0.3” 这样的行在您的 main.py 中。确保您在 申请的开始。这不是强制性的,但强烈建议。
创建一个 buildozer.spec 文件,其中包含:
根据规范编辑 buildozer.spec。你应该 至少更改 [app] 部分中的标题、package.name 和 package.domain。
使用以下命令启动 Android/调试版本:
现在是时候喝杯咖啡/茶了,或者如果你的电脑速度很慢,可以吃一顿晚餐。 第一个版本会很慢,因为它将下载 Android SDK、NDK 和 编译所需的其他工具。 别担心,这些文件将保存在全局目录中,并且会 在您将使用 Buildozer 管理的不同项目中共享。
最后,您应该在 bin/ 目录中有一个 APK 或 AAB 文件。
2.1 编辑 buildozer.spec
PyWebview 官网文档中描述了这一步。我个人推荐下载示例文件再做修改。
官网文档:
pywebview is designed to be built with buildozer. You need to include following lines in your to bundle pywebview correctlybuildozer.spec
2
android.add_jars = <path_to_pywebview-android.jar>pywebview-android.jar is shipped with and can be found under . To get > its full path typepywebviewsite-packages/pywebview/lib
2
print(util.android_jar_path())You can see a sample here bulldozer.spec
Edge 网页翻译:
pywebview 旨在使用 buildozer 构建。您需要在正确捆绑 pywebview 中包含以下行 buildozer.spec
2
android.add_jars = <path_to_pywebview-android.jar>pywebview-android.jar 随附,可以在 下找到。获取其完整路径类型 pywebviewsite-packages/pywebview/lib
2
print(util.android_jar_path())您可以在此处查看示例 bulldozer.spec
示例文件在 GitHub 上,点击跳转。
下载下来后,编辑其中内容。首先运行上述代码,获得一个路径,将其填入android.add_jars中。你还需要填写title、package.name、package.domain等项目。
如果你有多余的依赖库,应在requirements项目中列出;如果应用需要特定权限,应在android.permissions中列出(权限名请自行搜索)
3. 开始打包
打开 Ubuntu。第一次运行任何打包命令,将会下载安卓编译相关文件,可能需要等待一段时间,耐心等待。之后再编译就会快很多了。
3.1 debug 模式编译
debug 模式会快一些,直接生成 apk,方便调试。进入项目文件夹,运行如下命令:
1 | buildozer android debug |
3.2 release 模式编译
release 模式会在编译后压缩,生成 aab。在正式发布时,建议使用这种模式。直接运行下面命令即可:
1 | buildozer android release |
3.3 编译结束后
编译完成后会在bin/文件夹中生成 aab 或 apk 文件。建议将文件转移到 Windows 中操作。
4. 处理 aab/apk 文件
4.1 提取 apk
如果产生的是 aab 文件,你需要先提取 apk 文件。
此过程依赖 java 和 bundletool.jar 文件。(依赖安装方法太长了,不再赘述,网上有比我写得更详细的)
1 | java -jar bundletool.jar build-apks --bundle=[你的 aab 文件] --output=output.apks --mode=universal |
这样会得到一个output.apks文件,将它解压到output文件夹中。(我是这么做的)里面应该有一个universal.apk。
4.2 修改配置
如果项目中访问了任何明文 HTTP 资源(如本地服务器),就需要修改 apk 配置,因为安卓 9.0 开始,默认不接受明文 HTTP 请求,导致应用会直接闪退。想要修改此配置,需要先将 apk 解包。
此过程依赖 java 和 apktool.jar 文件。
1 | java -jar apktool.jar d output/universal.apk -o [输出目录] |
你的输出目录中有一个AndroidManifest.xml文件,修改其中<application>标签,添加一个属性android:usesCleartextTraffic="true"。修改后,用下面的命令重新打包。
1 | java -jar apktool.jar b [刚刚的输出目录] -o [输出文件名].apk |
这样就修改好了。
4.3 生成 KeyStore
生成的 apk 没有签名是不能使用的,而签名需要一个 jks 密钥。如果你没有 jks 文件(Java KeyStore),需要创建一个新的。
此过程依赖 keytool。
1 | keytool -genkey -keystore [输出文件名].jks -keyalg RSA -keysize 2048 -validity 10000 -alias [密钥别名] |
按照提示输入对应信息,就能生成一个 jks 密钥文件了。
注:此证书并不是永久有效的,它将会在 10000 天后过期。
4.4 签名
debug 模式的应从这一步开始。这是打包安卓的最后一步。
此过程依赖 apksigner。
1 | apksigner sign --ks [你的密钥].jks --ks-key-alias [密钥别名] --ks-pass pass:[密钥密码] -out [输出文件名].apk [未签名文件名].apk |
这样就完成了签名。至此,一个可安装的 APK 就打包好了。
5. 更多
我写了一个简单的脚本处理 aab 文件:
1 | #!/usr/bin/env python3 |
QriaMath 是我心血来潮写的一个练手的 PyWebview 项目,想试试打包安卓。属于是为了这瓶醋包了一盘饺子……